This guide provides detailed instructions on using the Advanced Abilities Framework in an Unreal Engine 5 project, covering key workflows for activating abilities, applying gameplay effects, spawning gameplay cues, and creating custom components. It is designed for developers and designers building Action RPGs, focusing on operational tasks and customization to extend the system with project-specific functionality. By following this guide, users will learn how to leverage the framework’s modular components effectively.
Usage Guide
This section outlines core workflows for using and customizing the Advanced Abilities Framework. Each subsection provides step-by-step instructions with practical Blueprint examples, tailored for both developers and non-programmers.
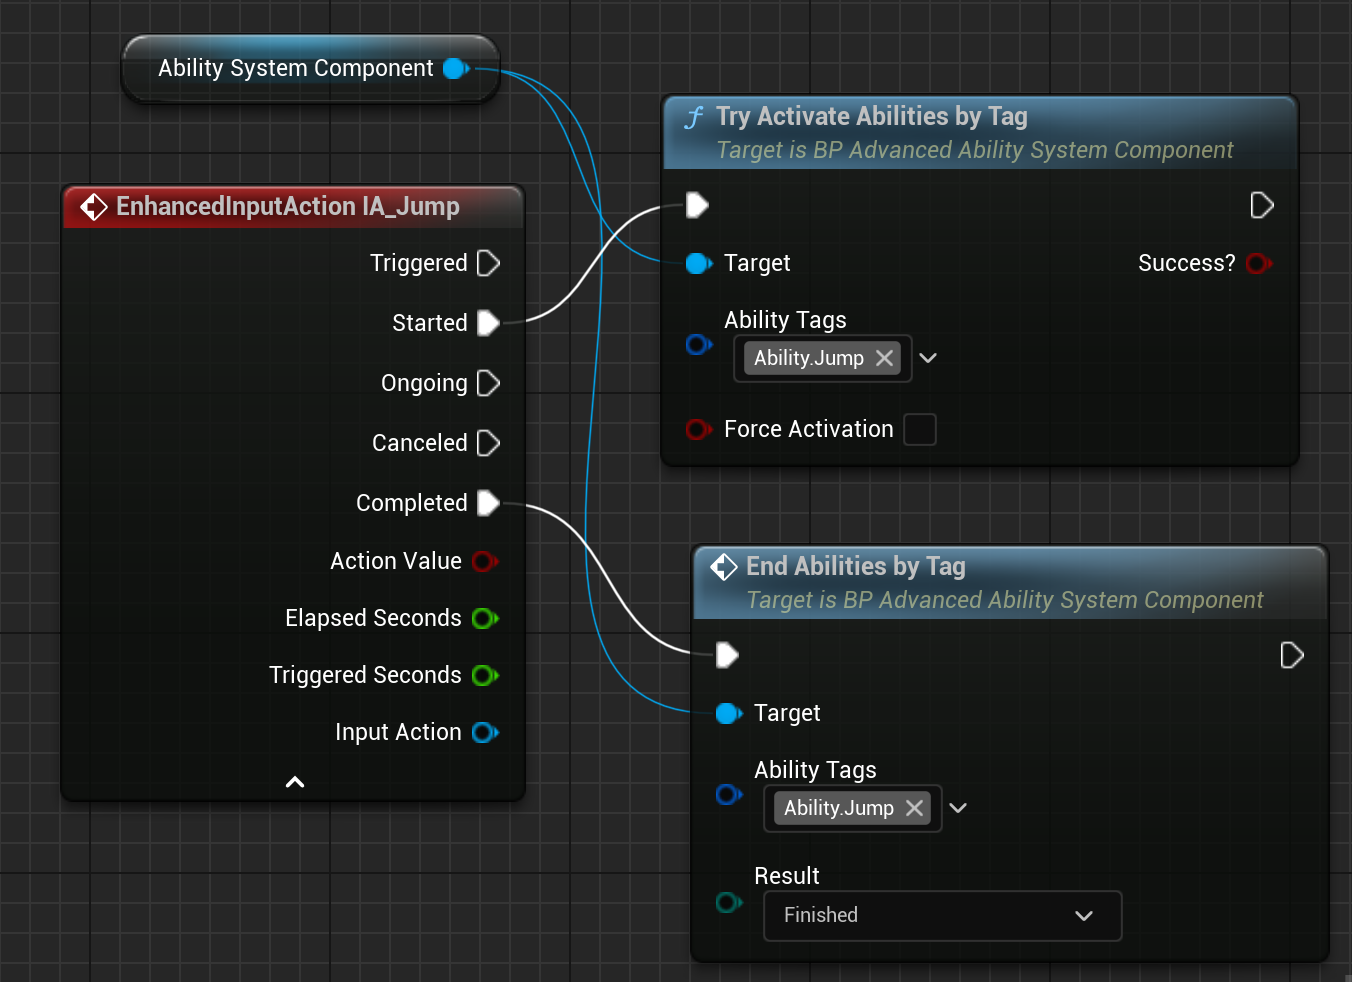
Activating Abilities
- Ensure the pawn has a
BP_AdvancedAbilitySystemComponentwith the desired abilities granted (e.g., viaDefault AbilitiesorGive Ability). - Bind an Input Action (e.g.,
IA_ActivateAbility1) to a key in the Input Mapping Context. - In the pawn’s Event Graph, call
Try Activate Abilities By TagorTry Activate Abilities By Class:
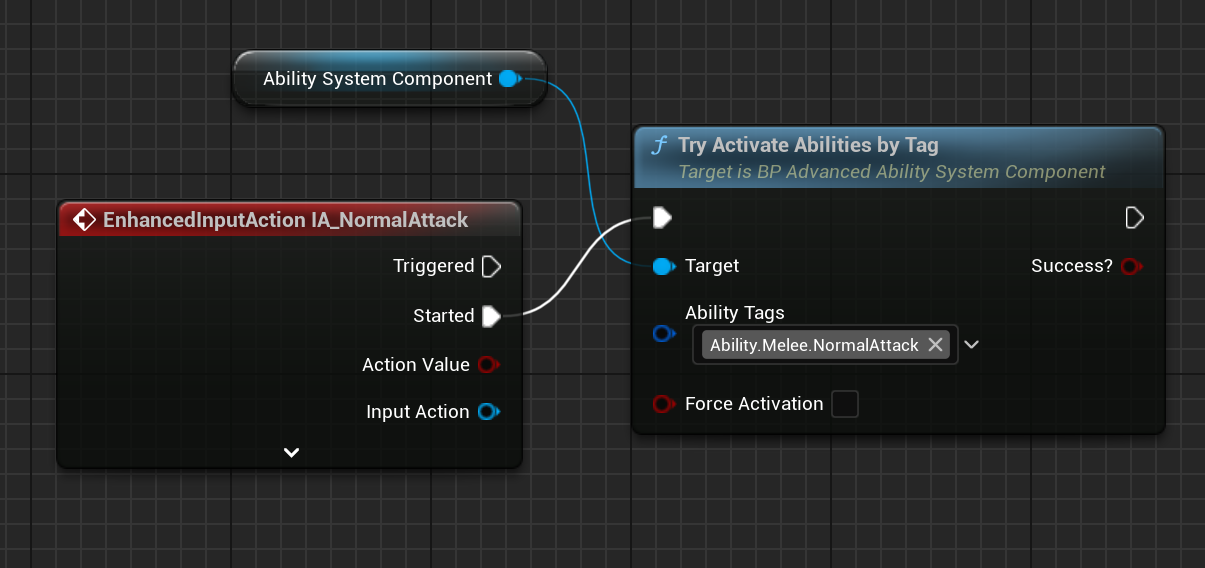
- Test by pressing the bound key and verifying the ability’s effects (e.g., attribute changes, visual cues).
Applying Gameplay Effects
- Create a child Blueprint of
BP_GameplayEffect(e.g.,GE_DamageEffect). - In the Details panel, set properties:
Duration: Set to 0 for instant effects (e.g., damage) or a value (e.g., 10 seconds) for buffs.Modifiers: Add an attribute modifier (e.g., reduceAttribute.Healthby 25).Gameplay Cues: Add a cue (e.g.,BP_ImpactEffectfor blood particles).
- Apply the effect via the Ability System Component:
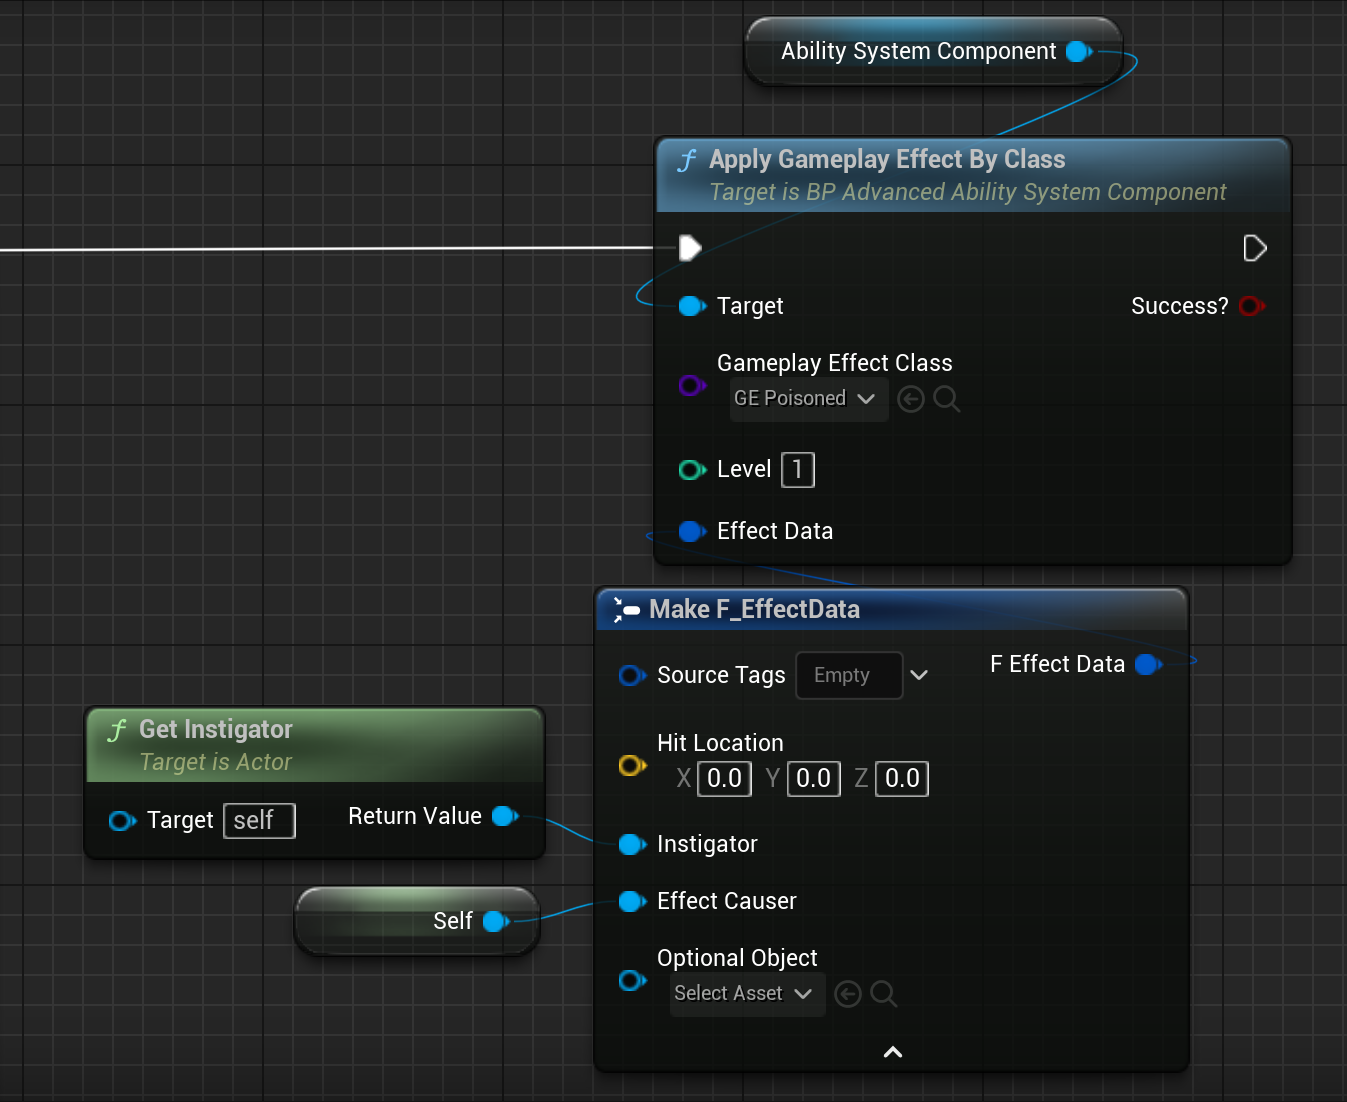
- Test by checking attribute changes (e.g., via Attribute Progress Bar Widget and cue spawning.
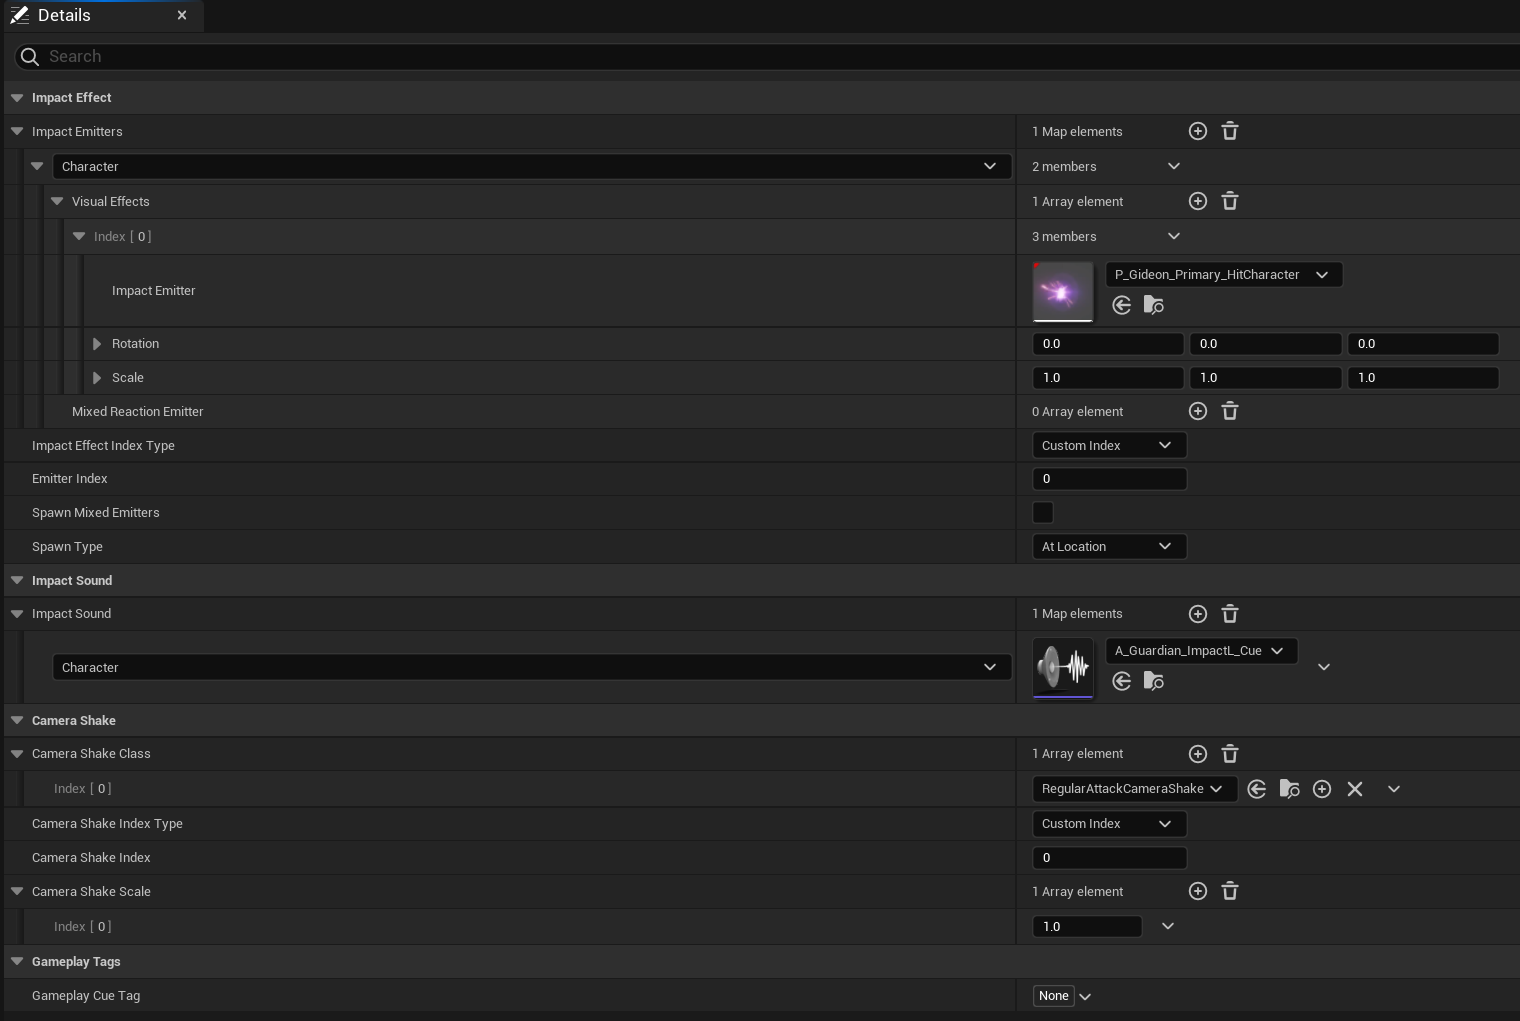
Spawning Gameplay Cues
- For simple cues, create a
BP_ImpactEffect(e.g.,BP_BloodImpact):- Set
Impact Emittersfor surface types (e.g.,Flesh: BloodParticles). - Set
Impact Sound(e.g.,BloodHitSound) andGameplay Cue Tag(e.g.,Cue.Impact.Blood).
- Set
- For complex effects, create a
BP_GameplayCueActor(e.g.,BP_ExplosionCue):- Set
Gameplay Cue Tag(e.g.,Cue.Explosion). - Override
OnExecuteto spawn particles and callDestroy Actorwhen complete:
- Set

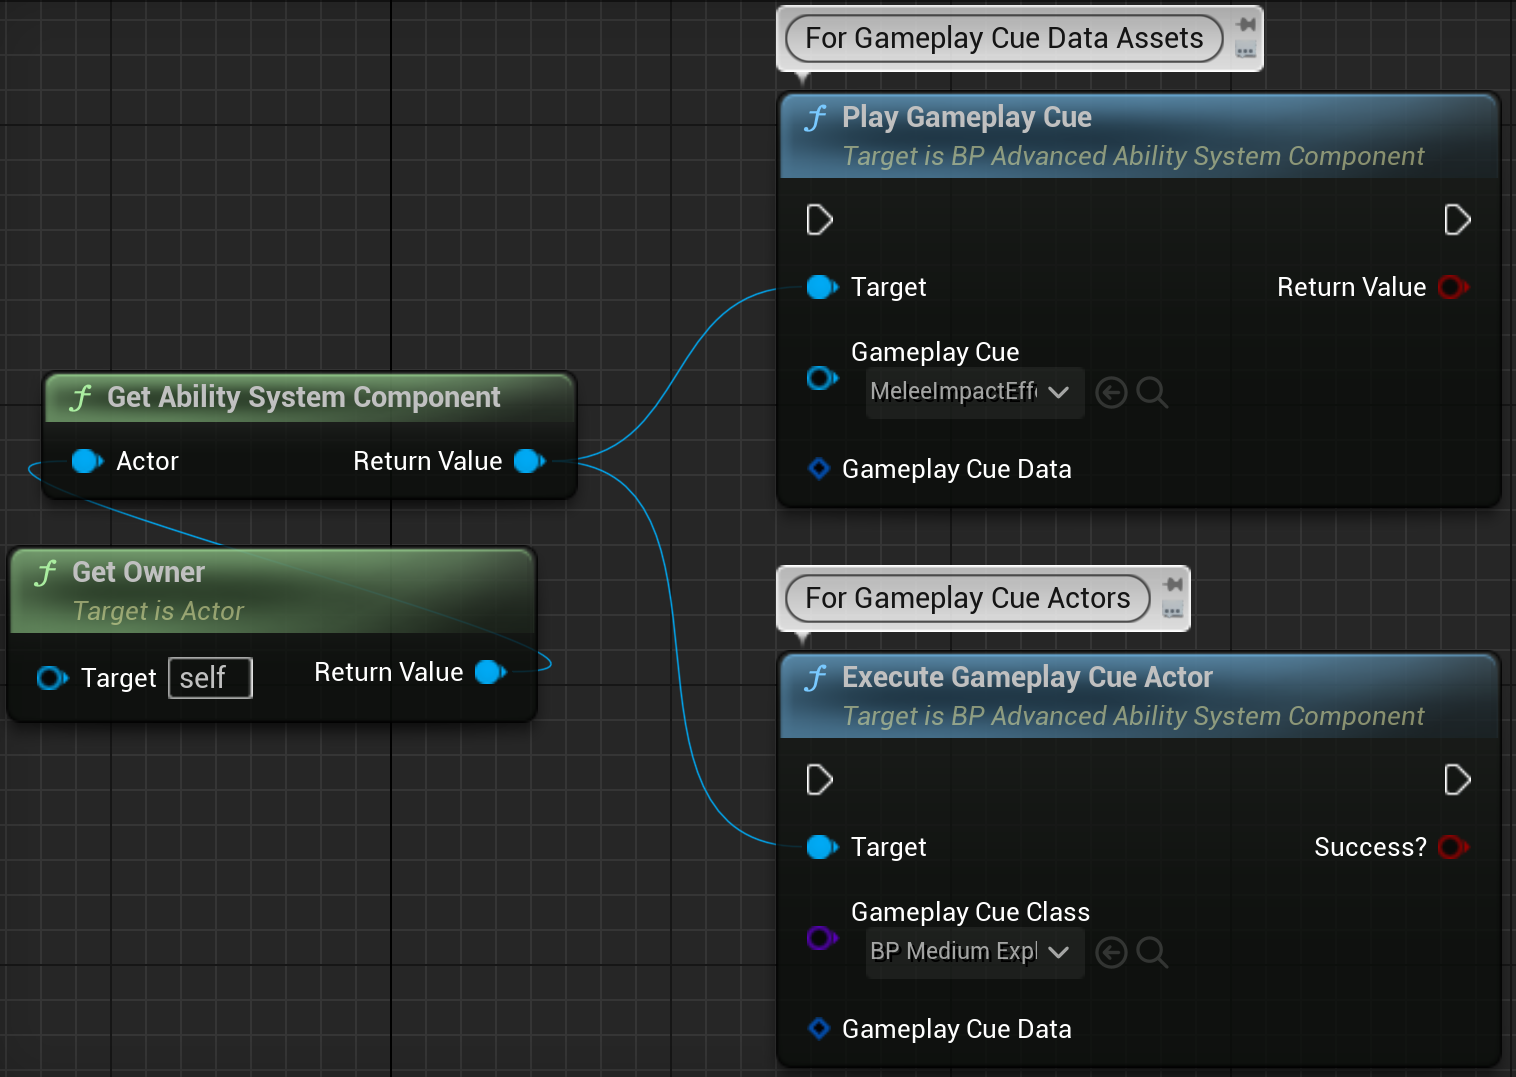
- Trigger the cue via the Ability System Component:
IMPORTANT NOTE:
Gameplay Cue Actors set to InstancePerExecution will NOT be deleted automatically. The Gameplay Cues with this setting will need to be manually deleted by the developer, as the Advanced Abilities System does not handle their automatic deletion.
Creating Custom Abilities
- Create a child Blueprint of
BP_AdvancedGameplayAbility(e.g.,GA_JumpAbility). - In the Details panel, set properties like
Gameplay Ability Tags(e.g.,Ability.Jump) andCost Gameplay Effect(e.g., reduceGE_StaminaCost). - Override
ActivateAbilityto define custom logic:
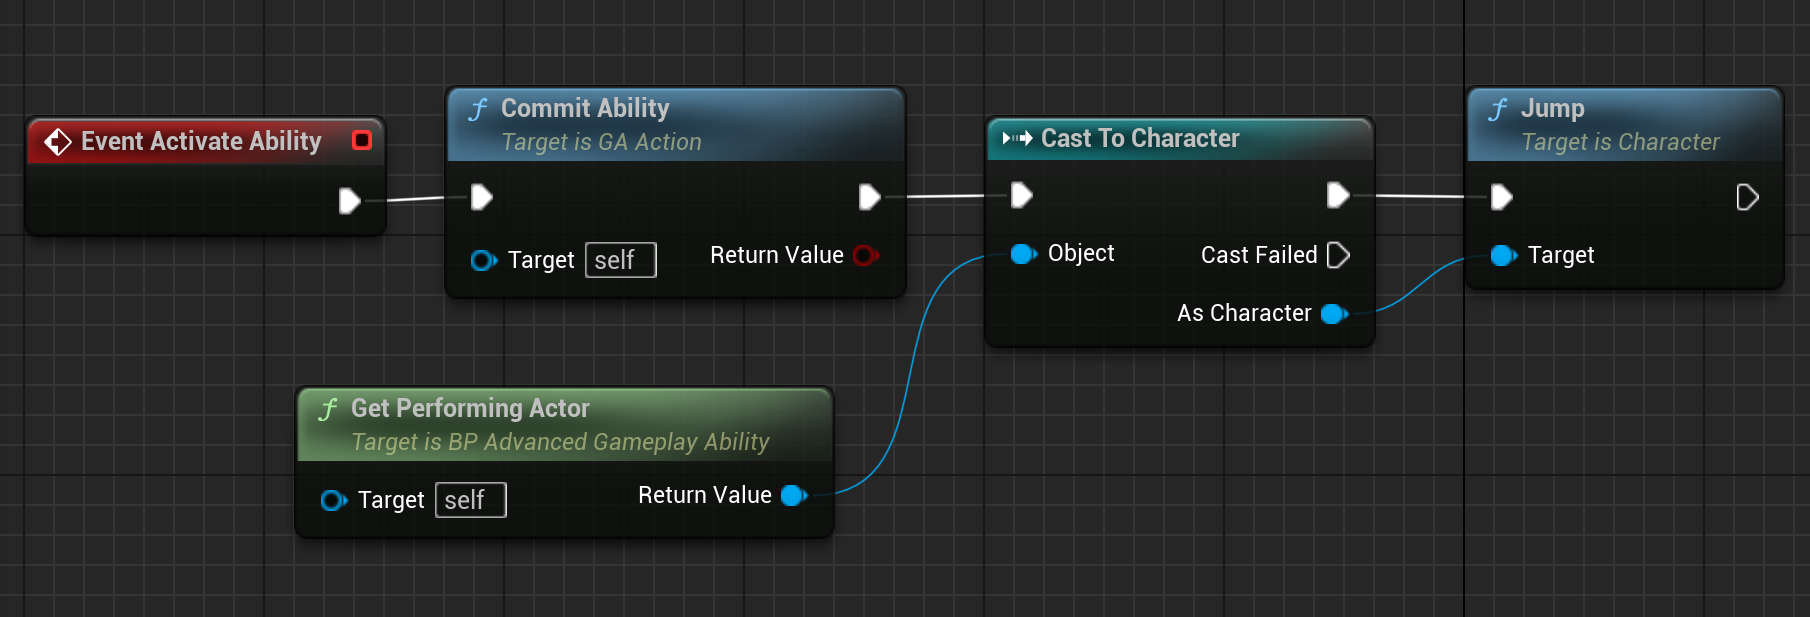
- Override
OnAbilityEndfor cleanup if needed (e.g., reset variables), ensuring the parent function is called forEnd Ability,Cancel Ability, orInterrupt Ability:
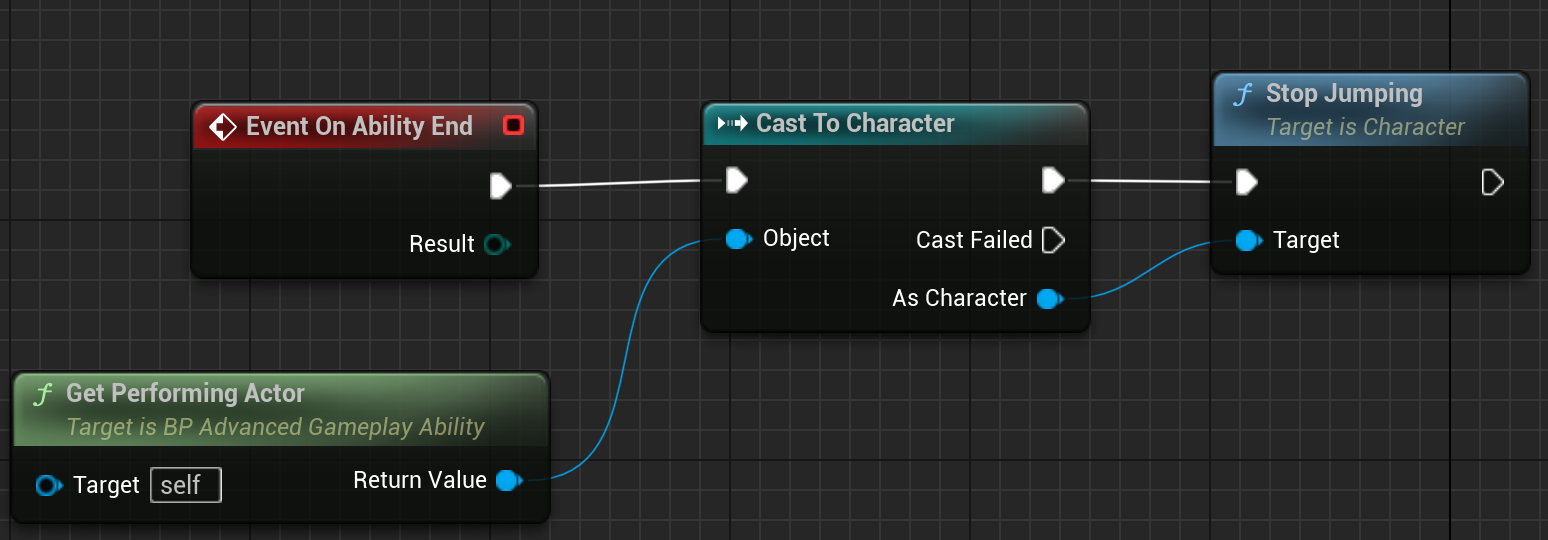
- Grant the ability to the
BP_AdvancedAbilitySystemComponent:
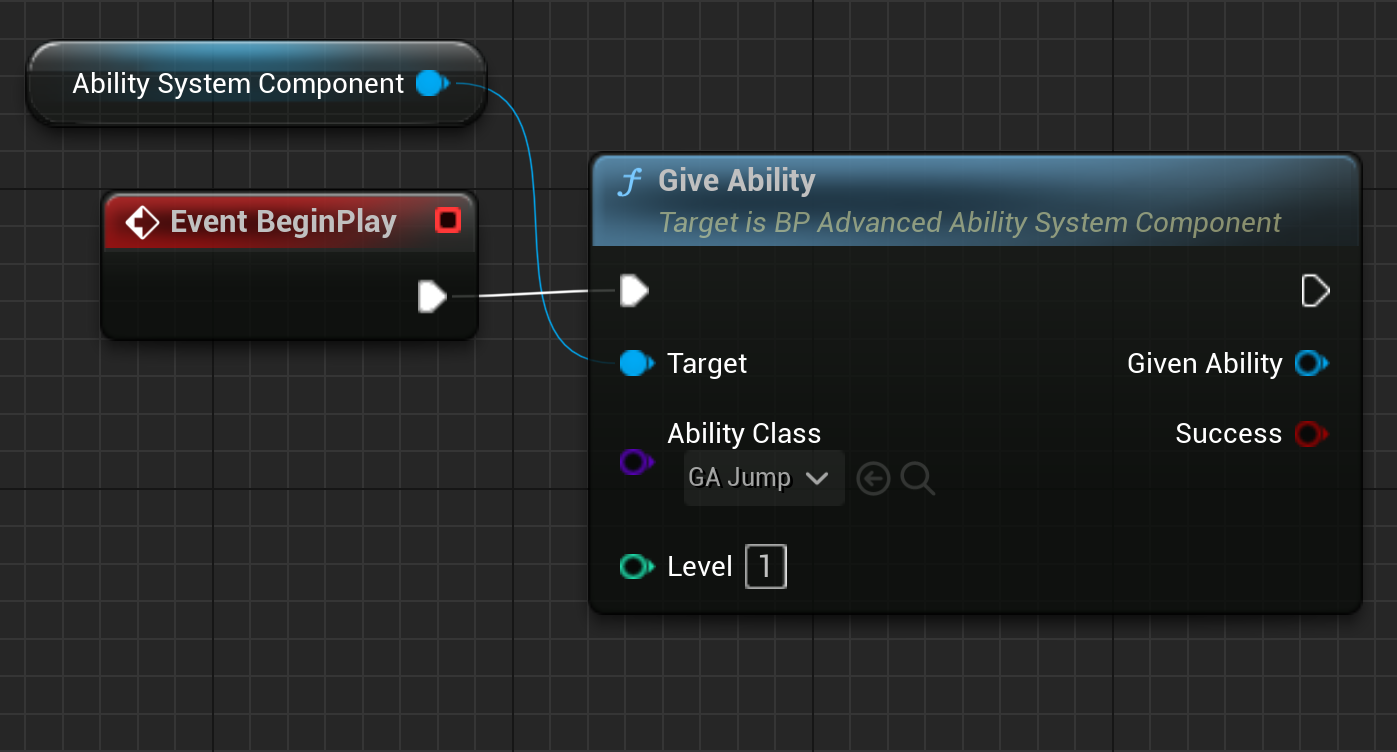
NOTE:
In the default setup for Advanced ARPG Combat, it is not required to explicitly call
GiveAbilityfor default abilities. These can be defined in either the player info data asset or the enemy info data asset. If using the Ability System standalone there is a Default Abilities array where default granted abilities can be added.
- Test New Ability by activating the ability (e.g. activate the jump ability through a jump input)
Creating a Custom Gameplay Effect (Poisoned)
-
Create a child Blueprint of
BP_GameplayEffect(e.g.,GE_Poisoned). -
Set properties:
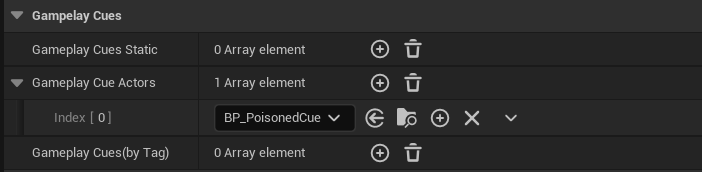
Duration Policy:Has DurationDuration: 90 secondsModifiers: decreaseAttribute.Healthby 2 points.Effect Tags:Effect.Negative,Effect.PoisonPeriod: 1.5 secondsGameplay Cue Actors:BP_PoisonedCue
-
Optionally, override
Apply Effectfor custom logic if needed:
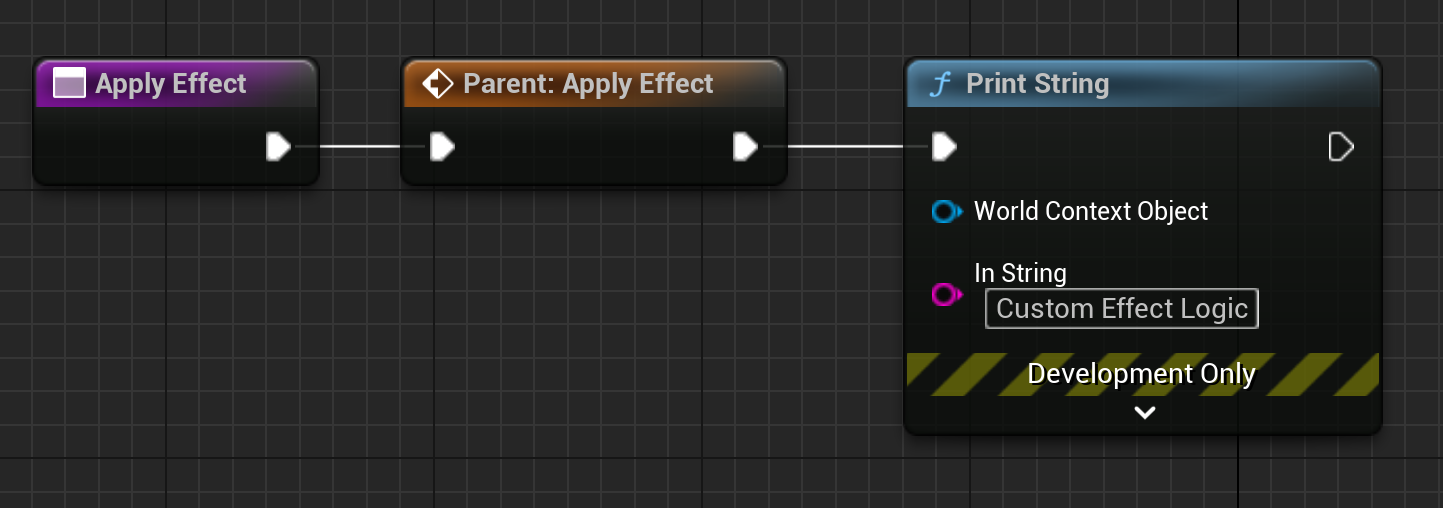
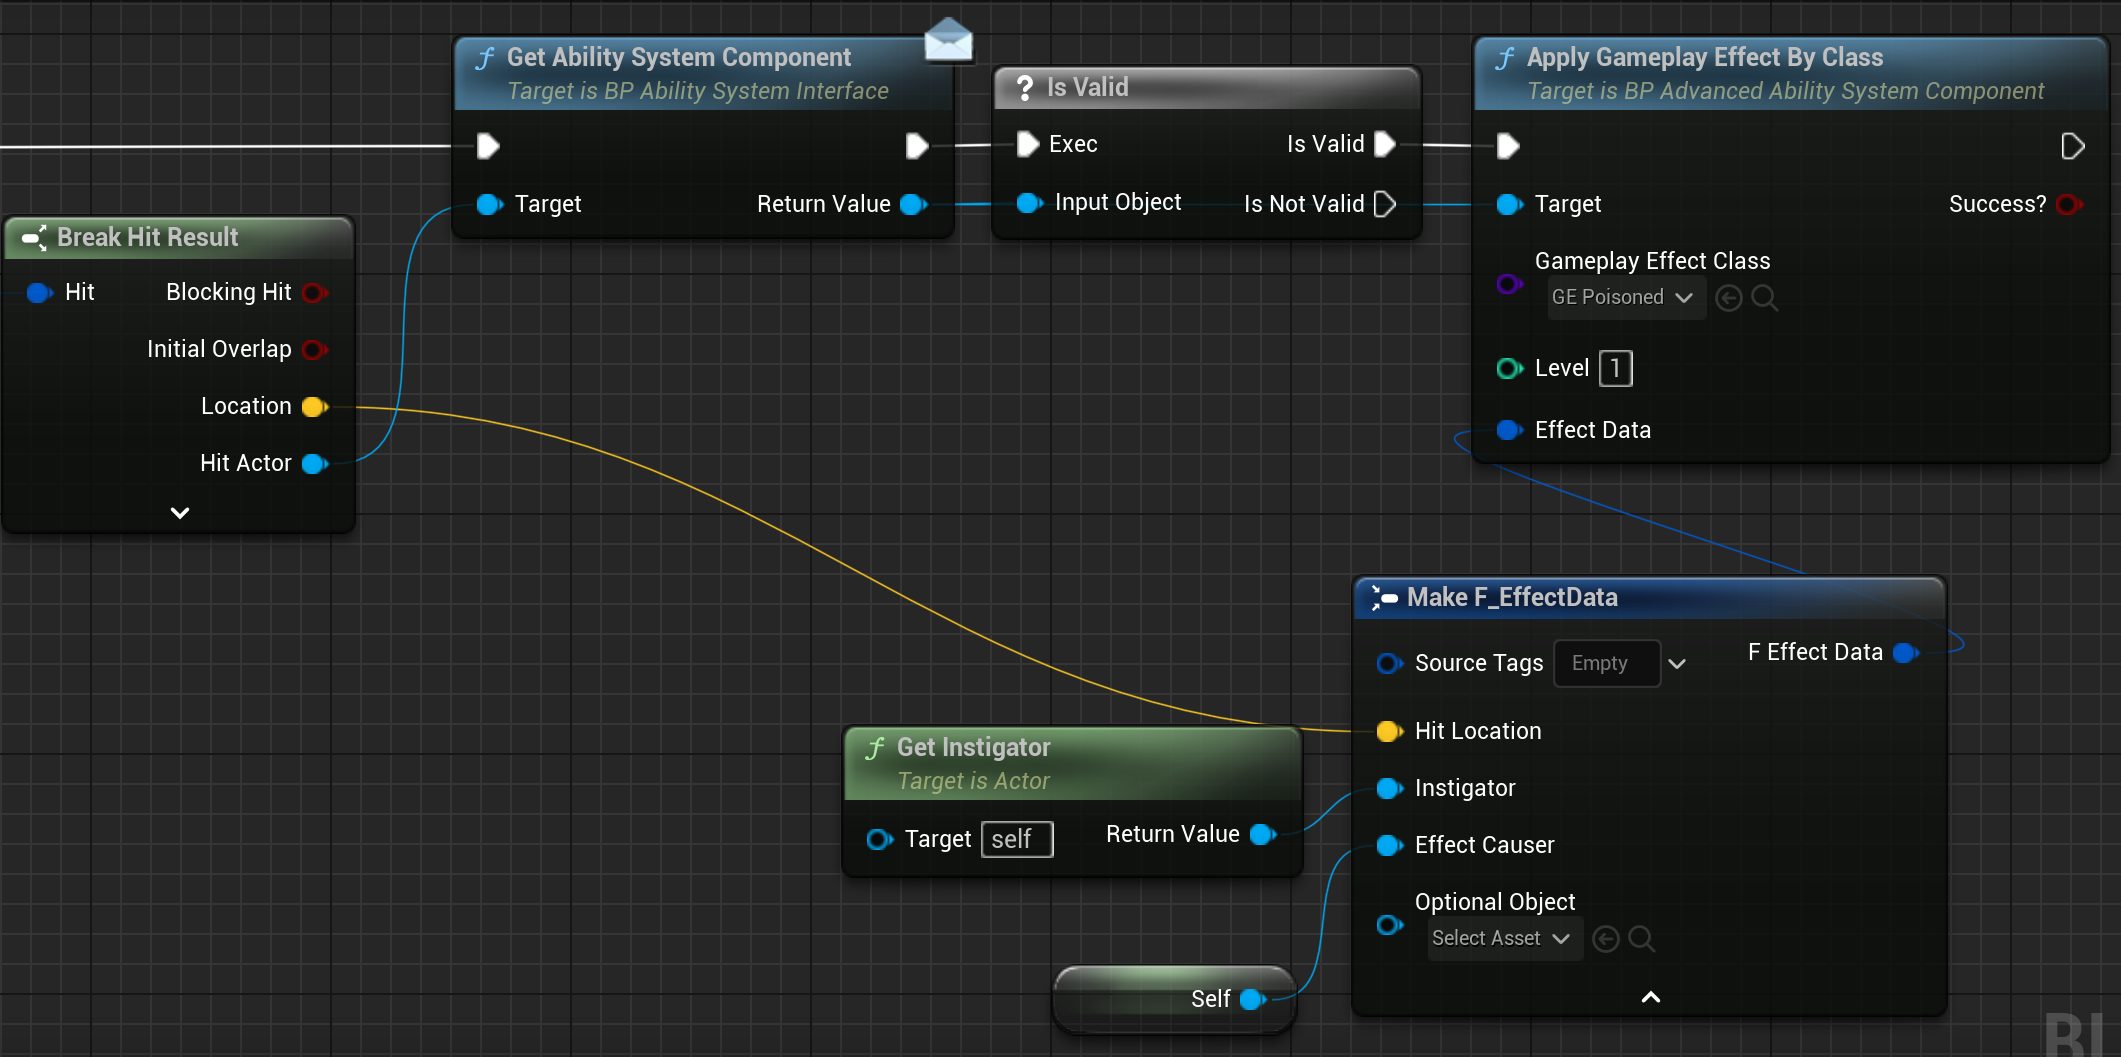
- Apply the effect in appropriate location where you want the poisoned effect to be applied:
Creating Custom Gameplay Cues
Custom Poisoned Gameplay Cue Actor (Stateful)
Stateful Gameplay Cues Instancing Policy MUST be set to Instance Per Actor so that the Ability System can hold onto and track the gameplay cue. Check Gameplay Cue Actor documentation for more information.
- For stateful cues, create a
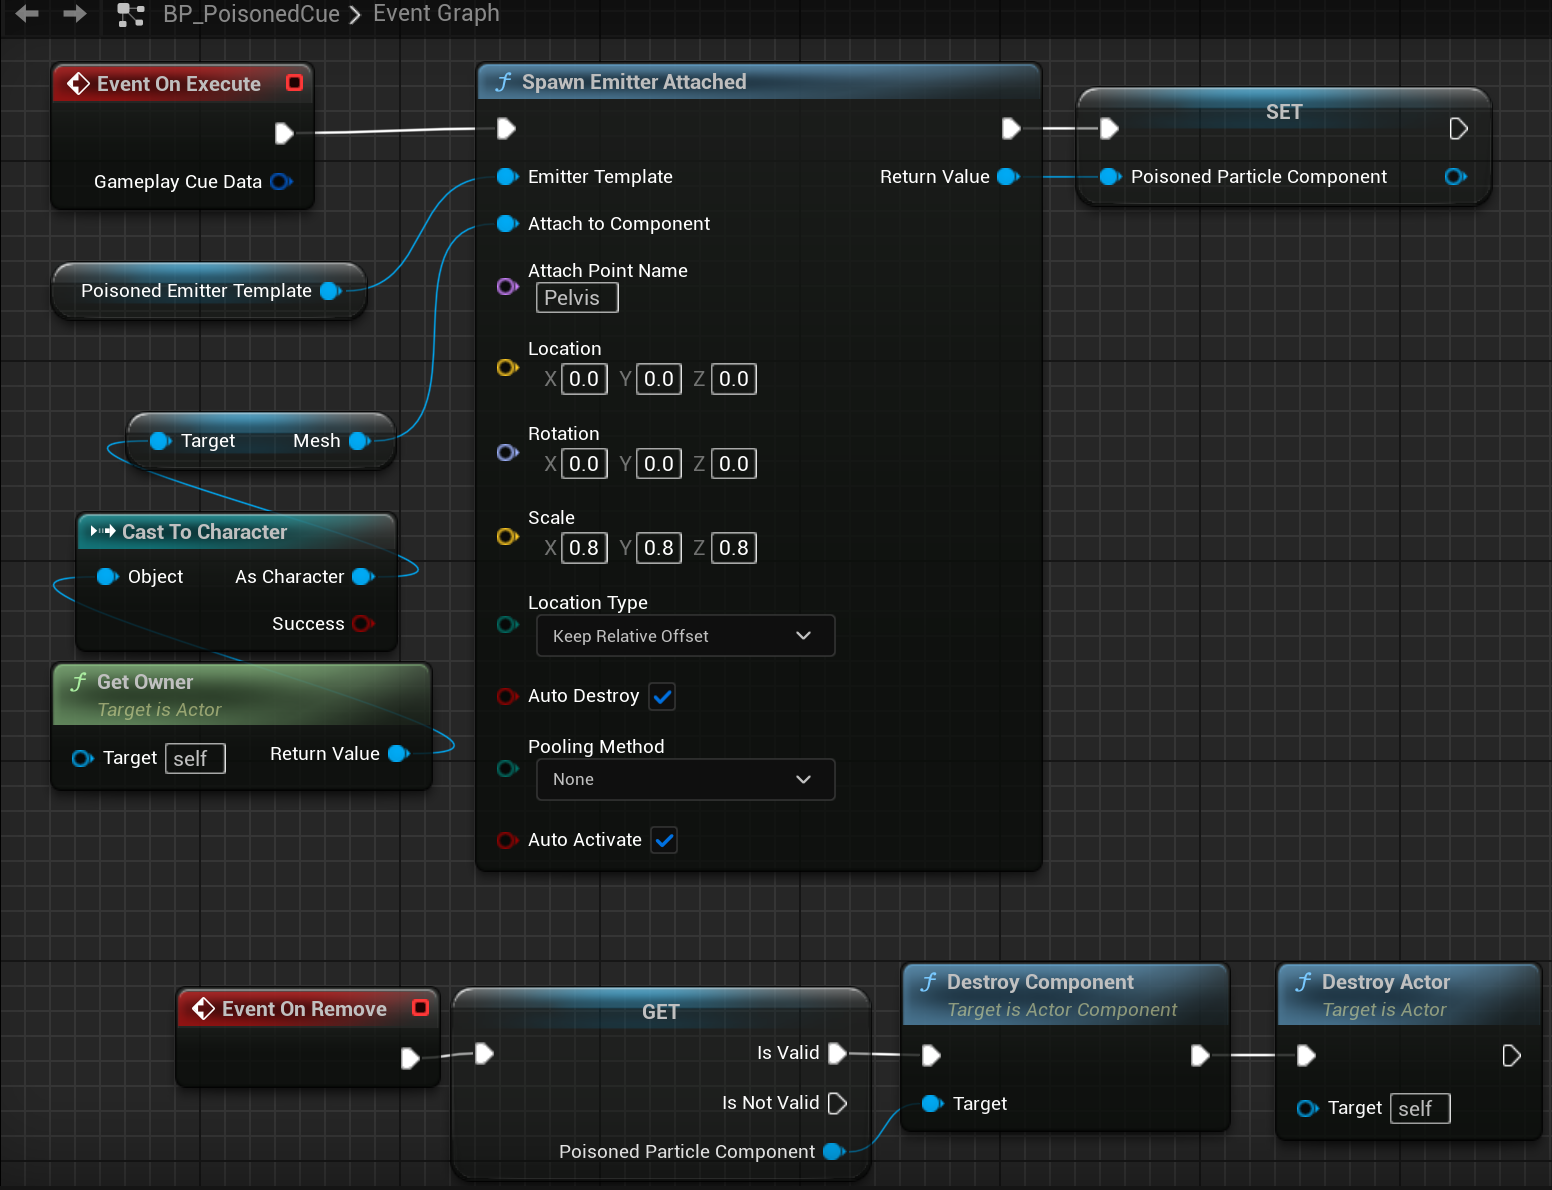
BP_GameplayCueActor(e.g.,BP_PoisonedCue):- Set
Instancing Policy(e.g.,Instance Per Actor). - Override
OnExecute:
- Set
NOTE:
Instance Per Actorshould be used when stateful changes need to be executed over a duration of time (e.g. a poison effect). For more information check: Gameplay Cue Actor.
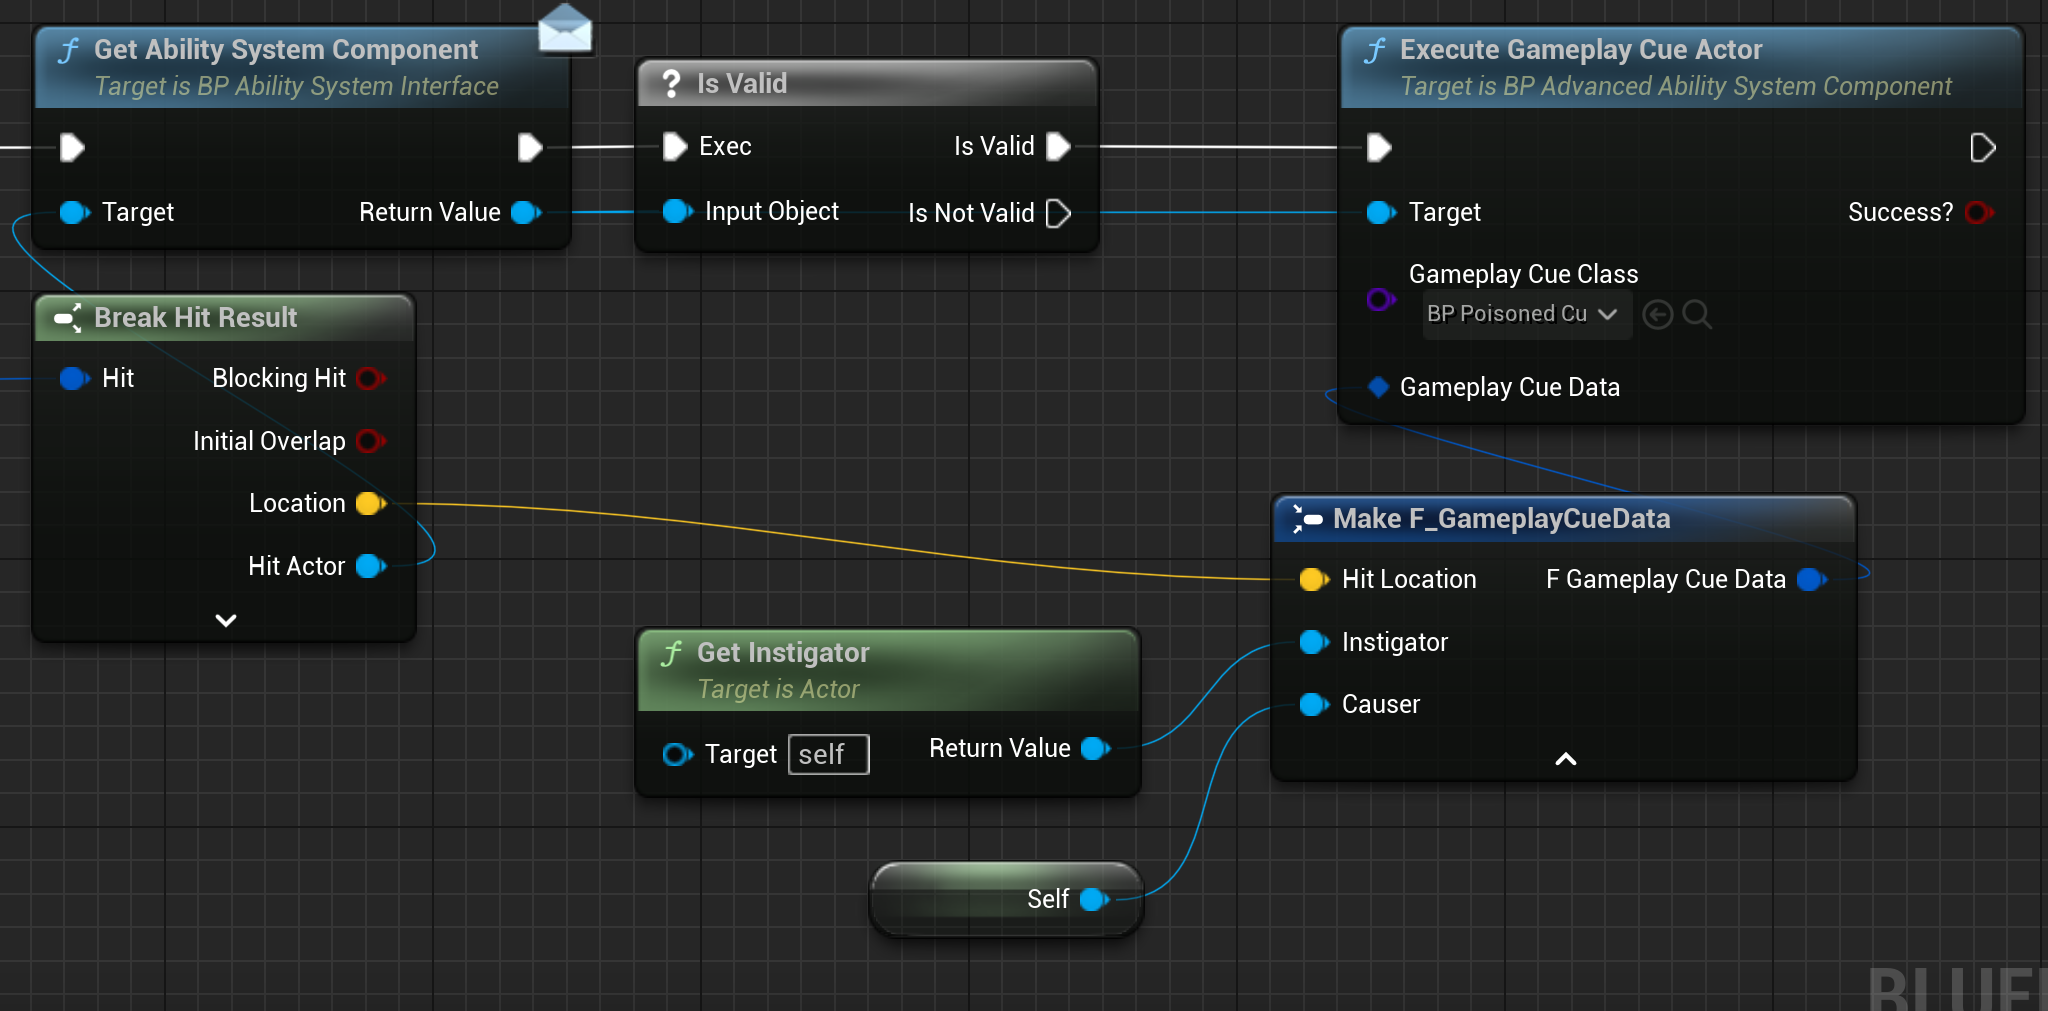
- Triggering a Stateful Gameplay Cue:
- Stateful gameplay gameplay cues can be triggered in one of two ways, through a gameplay effect or manually by calling Execute Gameplay Cue from either the ability system component or through an ability.
NOTE:
It is generally recommended to execute stateful gameplay cues through a gameplay effect.
- Add stateful gameplay cue to an appropriate gameplay effect you wish to associate with the stateful gameplay cue (e.g. GE_Poisoned)
- Apply the effect in appropriate location:
Apply the effect in the appropriate location and test to see if the gameplay cue is spawning, executing, and being removed and destroyed automatically with the gameplay effect.
NOTE:
The gameplay effect and any stateful gameplay cues will only be automatically removed if a duration is set. If no duration the gameplay effect will need to be manually removed.
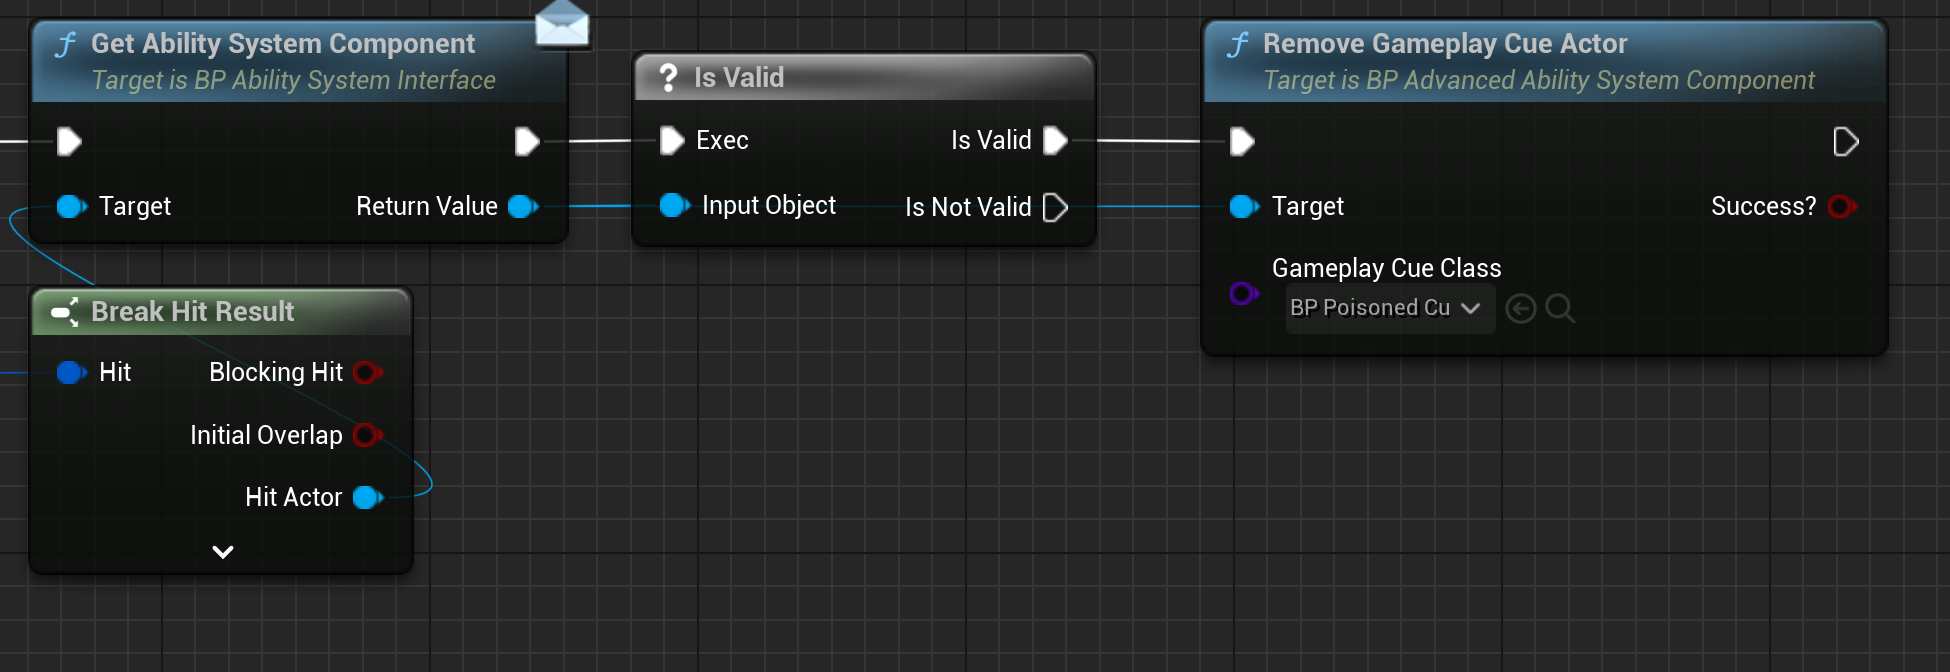
- Trigger manually (Optionally if not using with a gameplay effect):
- Remove Manually (Optionally if not using with a gameplay effect)
- Optionally handle executing and removing gameplay cue through an Ability (Optionally if not using with a gameplay effect)

Custom Gameplay Cue Actor (Explosion - Stateless)
Stateless gameplay cues are useful for more complex one off gameplay cues (e.g., BP_ExplosionCue). Stateless Gameplay Cues Instancing Policy MUST be set to Instance Per Execution so that the Ability System does NOT hold onto or track the gameplay cue. Check Gameplay Cue Actor documentation for more information.
- For stateless cues, create a
BP_GameplayCueActor(e.g.,BP_ExplosionCue):- Set
Instancing Policy(e.g.,Instance Per Execution). - Override
OnExecute:
- Set
NOTE:
Set the
Instancing PolicytoInstance Per Executionfor one off effects such as an explosion. For more information check: Gameplay Cue Actor.
- Add explosion effect, explosion sound, impulse, etc
- After delay call delete on actor
IMPORTANT:
Stateless gameplay cues will always remain in the world unless explicitly destroyed. Generally it is recommended to destroy the stateless gameplay cue actor after it has finished what it needed to do. For more information check: Gameplay Cue Actor.
Custom Gameplay Cue Data Asset
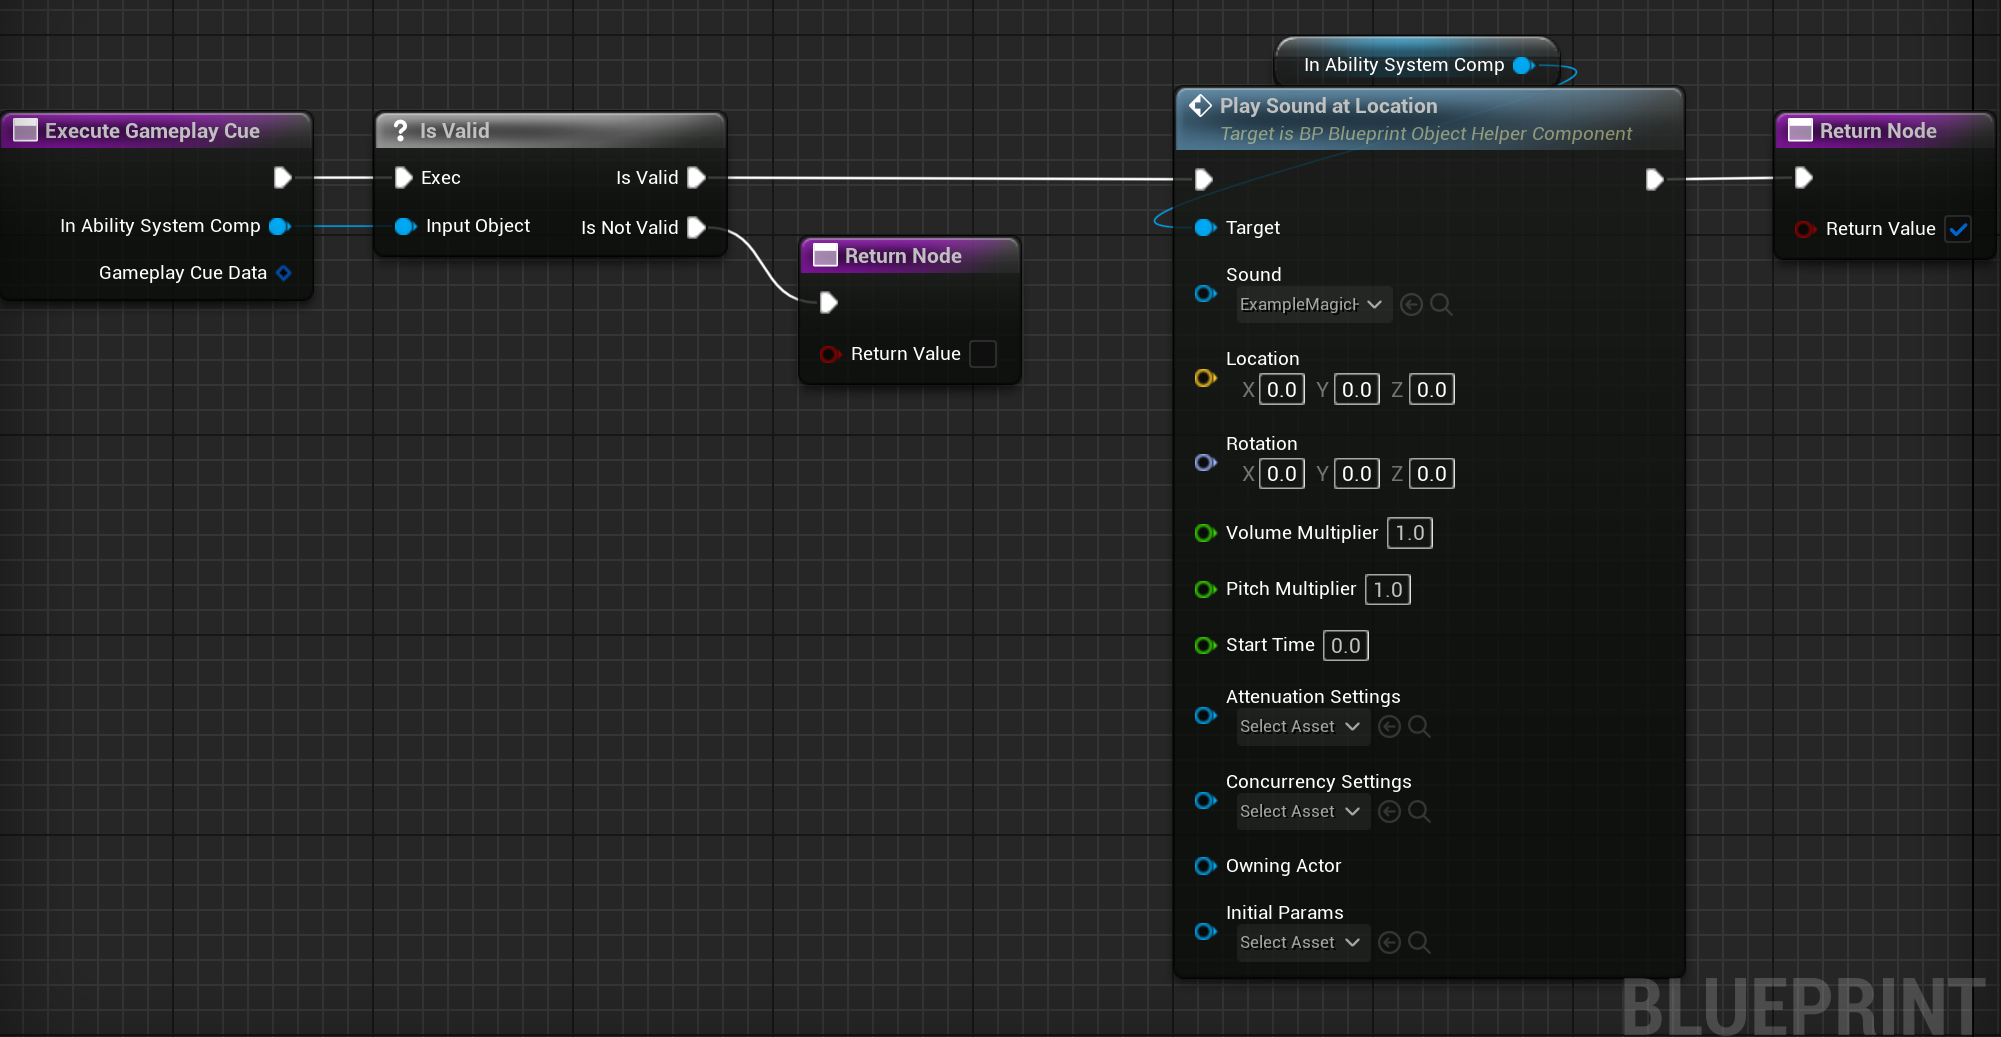
- For simple effects, create a
BP_GameplayCueData Asset (e.g.,BP_HitSound):- Set
Gameplay Cue Tag(e.g.,Cue.HitSound). - Override
OnExecuteto play a sound:
- Set
Creating Custom Ability Tasks
- Create a child Blueprint of
BP_AbilityTask(e.g.,BP_DelayedEffectTask). - Set
Task Instancing Policy(e.g.,Instance Per Executionfor one-off tasks). - Override
ActivateTaskfor task logic:ActivateTask -> Delay (Duration: 2) -> Apply Gameplay Effect By Class (Class: BP_DamageEffect) -> EndTask - Activate the task in an ability:
ActivateAbility -> Get BP_AdvancedAbilitySystemComponent -> Activate Task By Class (Class: BP_DelayedEffectTask, bAutoCreateTask: True)
Troubleshooting
- Abilities Fail to Activate:
- Ensure
Activation Required TagsandActivation Blocked Tagsare correctly set inBP_AdvancedGameplayAbility. - Verify the ability is granted via
Default AbilitiesorGive Ability.
- Ensure
- Gameplay Effects Don’t Apply:
- Check
Duration Policyis set toHas Durationfor timed effects andDurationis non-zero. - Confirm
Application Required Tagsare met on the target actor.
- Check
- Gameplay Cues Persist:
- For
BP_GameplayCueActorwithInstance Per Execution, callDestroy ActorinOnExecute. - Ensure
BP_GameplayEffecthas aDurationfor automatic cue cleanup.
- For
- Ability Tasks Don’t End:
- Verify
EndTaskis called inActivateTaskor after task completion.
- Verify
Best Practices
- Workflows:
- Use
PlayerInfoDataAssetorEnemyInfoDataAssetto centralize ability and effect assignments. - Prototype with preconfigured assets (e.g.,
GA_JumpAbility,GE_DamageEffect) before customizing.
- Use
- Pitfalls to Avoid:
- Don’t modify
BP_GameplayCuedata asset variables at runtime; use local variables instead. - Avoid frequent
Periodticks (<0.5s) inBP_GameplayEffectto prevent performance issues. - Don’t skip parent function calls in
BP_AdvancedGameplayAbilityoverrides likeEnd Ability.
- Don’t modify
- Performance Considerations:
- Use
BP_GameplayCuefor simple effects to reduce actor spawning. - Limit active
BP_GameplayCueActorsby reusingInstance Per Actorfor stateful effects.
- Use