This guide provides step-by-step instructions for integrating and using the Advanced Attributes System in an Unreal Engine 5 project. Developers will learn how to set up the system, configure attributes for actors, display attributes on the HUD, and test default functionality using included assets. The guide focuses on enabling the system as it functions in the Advanced ARPG Combat demo content, ensuring quick and effective integration.
Prerequisites
- Unreal Engine 5.3 or later.
- A project configured with the Gameplay Tag system enabled (default in most Unreal Engine 5 templates).
- If using standalone, no additional plugins are required. If using with Advanced ARPG Combat, ensure the full framework is migrated.
- Basic familiarity with Unreal Engine Blueprints and Gameplay Tags.
Integration Steps
-
Copy the System Assets:
- Copy the
AdvancedAttributesSystemfolder from the Advanced ARPG Combat project (or provided assets) to your project’sContentdirectory.
- Copy the
-
Add Attributes Component to an Actor:
- Open the Blueprint for the actor (e.g., player character or enemy, such as
BP_PlayerCharacter). - Add a new component of type
BP_AttributesComponentto the actor.
- Open the Blueprint for the actor (e.g., player character or enemy, such as
-
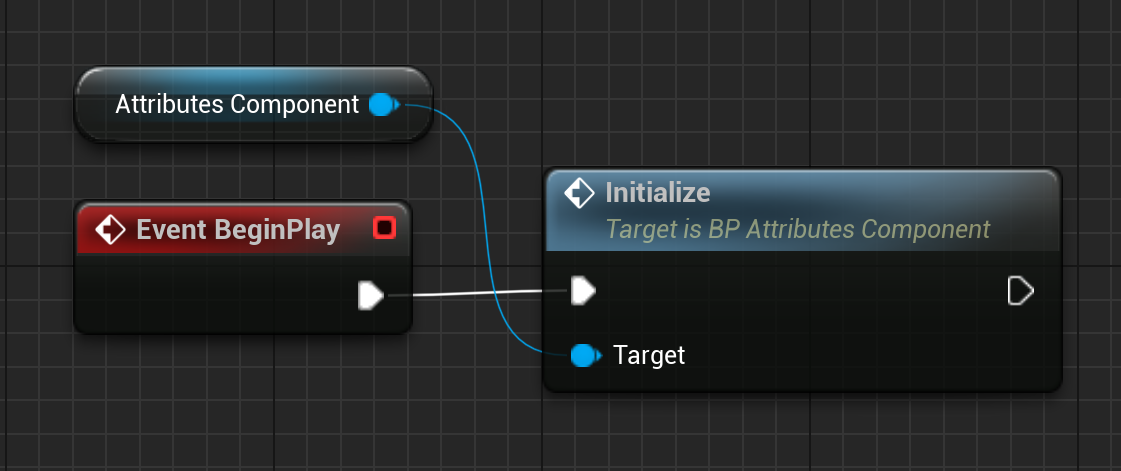
Initialize the Attributes Component:
- In the actor’s Blueprint, get a reference to the
BP_AttributesComponent(e.g., viaGet Component by Class). - On
Event BeginPlay, call theInitializefunction on theBP_AttributesComponentto ensure proper setup.
- In the actor’s Blueprint, get a reference to the
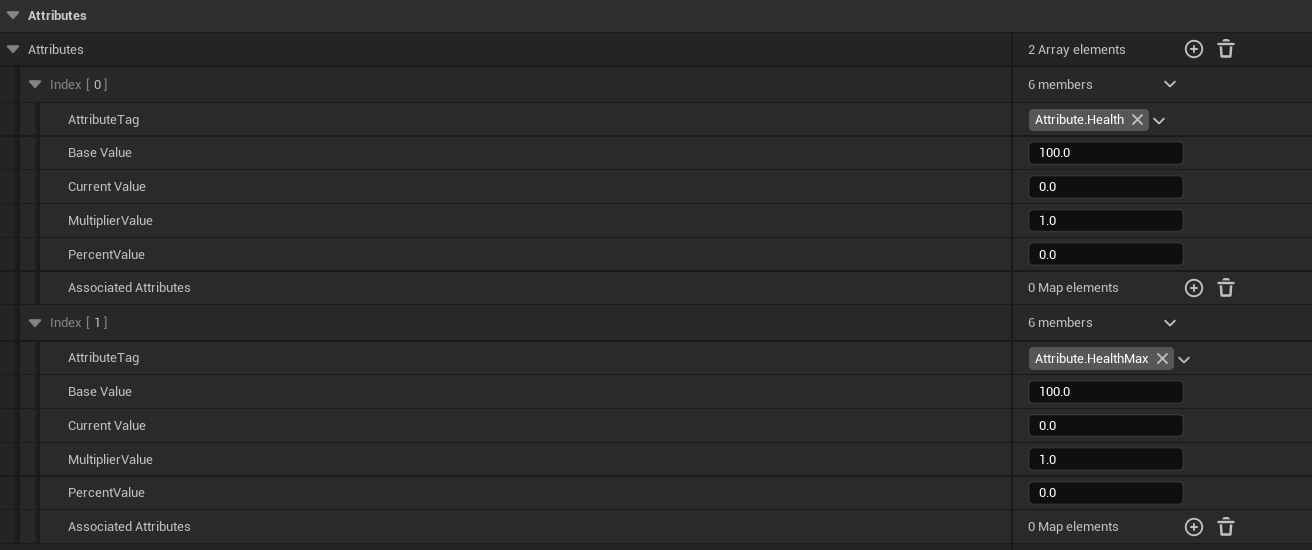
- Configure Default Attributes:
- Select the
BP_AttributesComponentin the actor’s Details panel. - In the
Attributesarray, add elements for each attribute (e.g.,Attribute.Health,Attribute.HealthMax). - Set default values (e.g., Base Value = 100 for
Attribute.Health).
- Select the
Note:
If using Advanced ARPG Combat, define attributes in the
PlayerInfoDataAssetorEnemyInfoDataAssetunder theAttributesarray.
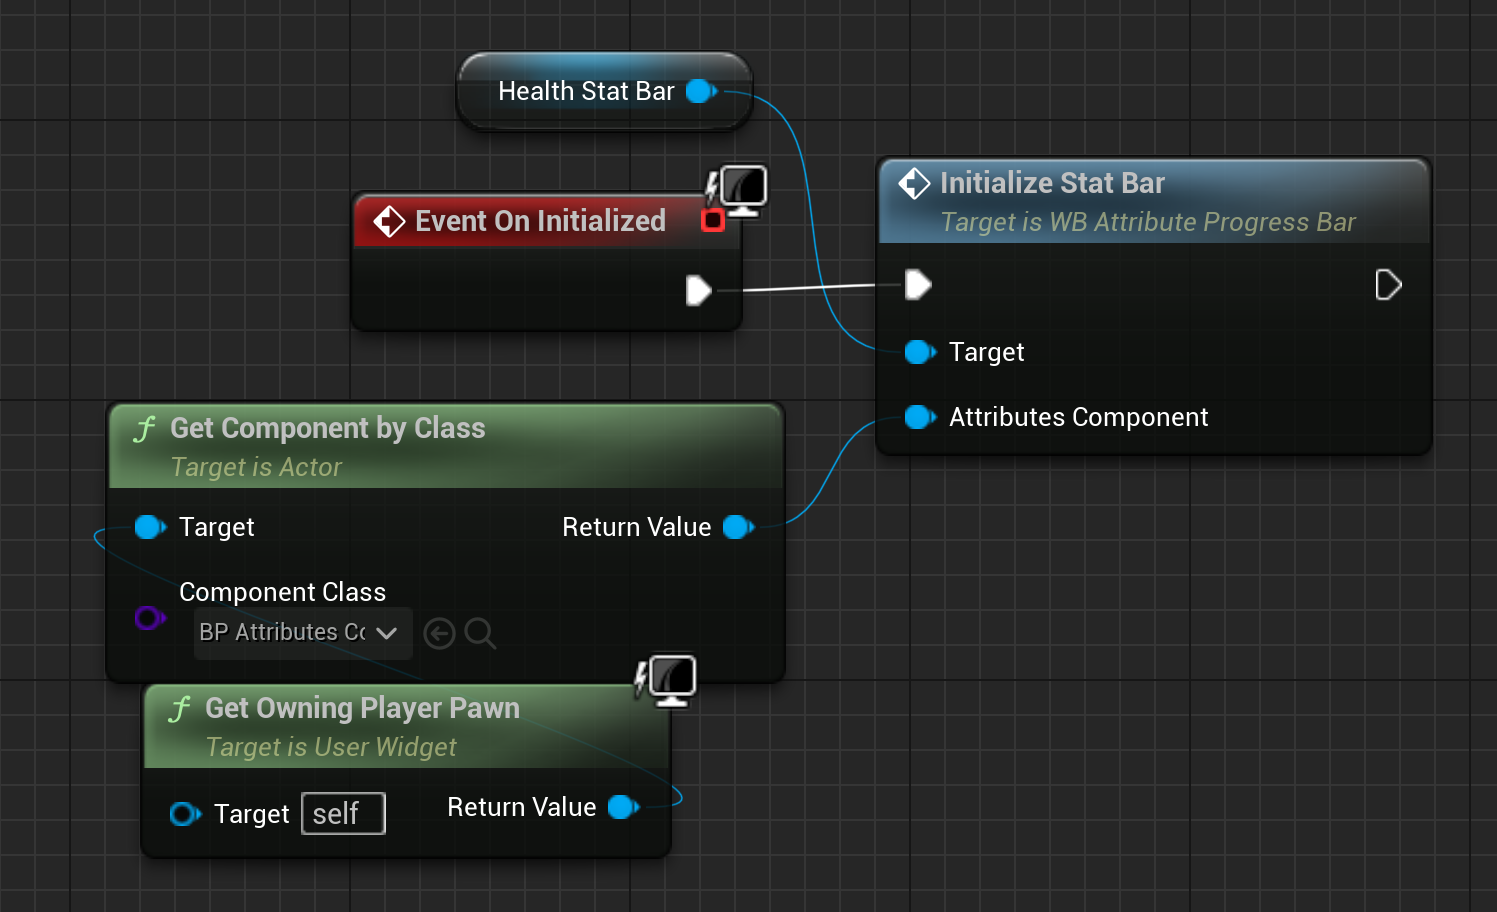
- Set Up HUD (Optional):
- Open the HUD widget Blueprint (e.g.,
WBP_HUD). - Add a
WB_AttributeProgressBarwidget to the desired location (e.g., a Vertical Box). - Set the
AttributeTag(e.g.,Attribute.Health) andMaxAttributeTag(e.g.,Attribute.HealthMax) in the widget’s Details panel. - In the HUD’s Event Graph, on
Event Construct, initialize the progress bar:
- Open the HUD widget Blueprint (e.g.,
NOTE:
If using Advanced ARPG Combat’s default HUD, add the progress bar to the
AttributeBarsVerticalBox, and initialization is handled automatically.
-
Configure Test Input:
- In Project Settings > Input > Input Actions, create an Input Action (e.g.,
IA_TestAttribute). - In an Input Mapping Context (e.g.,
IMC_Default), mapIA_TestAttributeto a key (e.g., “T”). - In the actor’s Blueprint, add an
Enhanced Input Componentand bindIA_TestAttributeto callModifyAttribute:
InputAction IA_TestAttribute (Pressed) -> Get BP_AttributesComponent -> ModifyAttribute (AttributeTag: Attribute.Health, Value: -25) - In Project Settings > Input > Input Actions, create an Input Action (e.g.,
-
Test the System:
- Place a default actor (e.g.,
BP_PlayerCharacter) in the level. - Play in Editor and press the bound key (e.g., “T”) to modify
Attribute.Health. - Verify the attribute updates in the HUD (if set up) or use
GetCurrentAttributeValueto print the value:
ModifyAttribute -> GetCurrentAttributeValue (AttributeTag: Attribute.Health) -> Print String - Place a default actor (e.g.,
Troubleshooting
- Attributes Not Modifying:
- Ensure
Initializeis called onBP_AttributesComponentduringEvent BeginPlay. - Verify the
AttributeTag(e.g.,Attribute.Health) exists in the Gameplay Tags table.
- Ensure
- HUD Not Updating:
- Confirm
WB_AttributeProgressBaris initialized with a validBP_AttributesComponentreference. - Check that
AttributeBarsVerticalBoxis used if leveraging Advanced ARPG Combat’sMainHUD.
- Confirm
- Input Not Working:
- Verify the Input Mapping Context (
IMC_Default) is applied viaAdd Mapping ContextonEvent BeginPlayin the Player Controller. - Ensure the
Enhanced Input Componentis added to the actor.
- Verify the Input Mapping Context (
- Regeneration Not Occurring:
- Confirm the attribute is linked to a
BP_BaseRegeneratableAttributein theExtendedAttributesarray. - Check
RegenRateandRegenTickIntervalare set in the regeneratable attribute class.
- Confirm the attribute is linked to a
Best Practices
- Workflows:
- Use
PlayerInfoDataAssetorEnemyInfoDataAssetfor centralized attribute configuration in Advanced ARPG Combat projects. - Bind
OnAttributeValueModifiedto update UI or trigger gameplay events for seamless integration.
- Use
- Pitfalls to Avoid:
- Don’t skip
InitializeonBP_AttributesComponent, as it sets up critical data. - Avoid duplicate Gameplay Tags in the
Attributesarray to prevent conflicts.
- Don’t skip
- Performance Considerations:
- Limit the number of
ExtendedAttributesper actor to avoid overhead. - Use simple curves in the
AssociatedAttributessystem to reduce calculation complexity. - Disable
bUpdateAttributeLerpBarinWB_AttributeProgressBarfor minor attributes to optimize HUD performance.
- Limit the number of