This guide provides detailed instructions on using the Input Buffering System in an Unreal Engine 5 project, covering key workflows for queuing inputs, managing buffer states, and extending the system with custom input actions. Users will learn how to trigger buffered inputs, integrate with abilities, and create custom input behaviors for Souls-like Action RPGs. The guide is designed for developers and designers to effectively utilize input queuing for responsive combat mechanics.
Queuing Inputs
Queue inputs during action commitments to ensure they execute when the buffer window closes.
-
Ensure the
BP_InputBufferComponentis added to the pawn (e.g.,BP_PlayerCharacter). -
On input action events, call
Store Input In Bufferwith the appropriateInputTagandInput Status:Enhanced Input Action (IA_Dodge, Triggered) -> Get Component By Class (Class: BP_InputBufferComponent) -> Store Input In Buffer (InputTag: InputTag.Dodge, bConsumeInputBuffer: true, Input Status: Pressed)Enhanced Input Action (IA_Dodge, Completed) -> Get Component By Class (Class: BP_InputBufferComponent) -> Store Input In Buffer (InputTag: InputTag.Dodge, bConsumeInputBuffer: false, Input Status: Released) -
Verify the input is queued during an
ANS_InputBufferwindow (e.g., inAM_Heal).
Managing Buffer Windows
Control when the input buffer opens and closes using ANS_InputBuffer in Animation Montages.
- Open an Animation Montage (e.g.,
SwordSwing_Montage). - Add an
ANS_InputBufferAnim Notify State to the frames where input buffering is needed.
gantt
    title Sword Swing Animation (30 Frames, 30 FPS)
    dateFormat YYYY-MM-DD HH:mm:ss.SSS
    axisFormat %Lms
    tickInterval 200ms
    section Animation
    Full Animation Duration (Frames 1-30) :s1, 2025-05-14 21:00:00.000, 2025-05-14 21:00:01.000
    section Notify
    Input Buffer Active (Frames 10-15) :crit, active, 2025-05-14 21:00:00.333, 2025-05-14 21:00:00.500
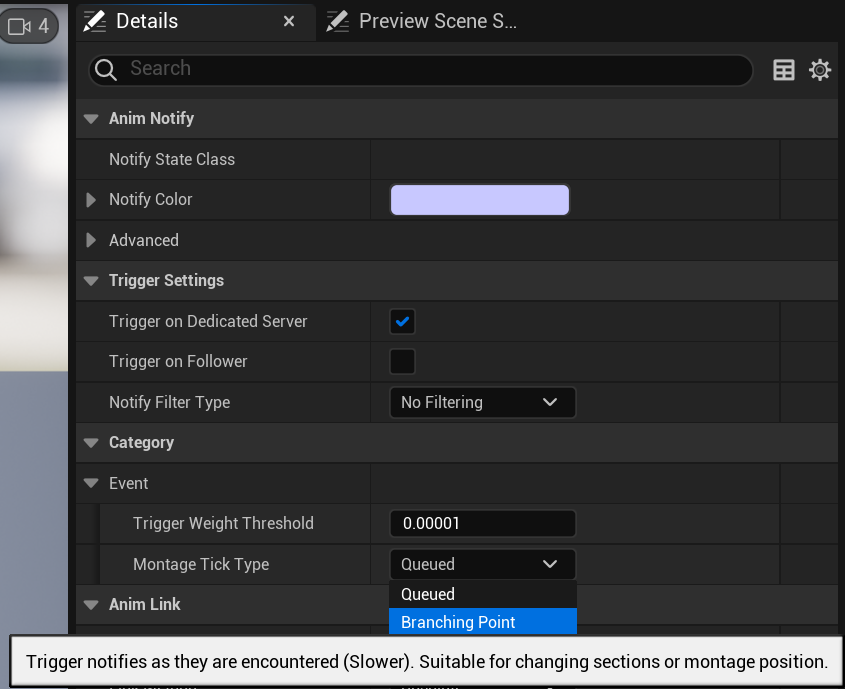
IMPORTANT NOTE:
If you ever have the issue of the notify state being called twice, E.g. Buffered Input Actions cancel into each other when spamming inputs, make sure to change the Montage Tick Type to Branching Point.
Managing Buffer States
-
The buffer opens on notify start, queues inputs, and consumes the last input on notify end, triggering
On Input Buffer Consumed. -
Bind to buffer state events for additional logic:
BP_InputBufferComponent -> On Input Buffer Opened -> Spawn Emitter At Location (Emitter: BufferStartFX)BP_InputBufferComponent -> On Input Buffer Closed -> Log Message (Text: Buffer Closed)
Handling Consumed Inputs
Process buffered inputs when the buffer consumes them, executing actions or abilities.
-
In
BP_PlayerCharacter, bind to theOn Input Buffer Consumedevent onBP_InputBufferComponent. -
Use a
Switch on Gameplay Tagto handle differentInputTagcases:On Input Buffer Consumed (InputTag) -> Is Character Dead? -> Branch (False) -> Switch on Gameplay Tag (InputTag) -> Case InputTag.Dodge -> PerformDodge Case InputTag.Attack -> PerformAttack -
Ensure the pawn validates state (e.g., not dead) before executing actions.
Integrating with Abilities
Bind abilities to buffered inputs using the Advanced Abilities System or custom logic.
-
Using
Ability SetorCombat Style:- In the
Ability SetorCombat StyleData Asset, assign abilities toInputTagvalues (e.g.,InputTag.DodgetoGA_Dodge). - Grant the
Ability Setto the pawn onEvent BeginPlay:Event BeginPlay -> Get AbilitySystemComponent -> GiveAbilitySets(AbilitySet: AS_Combat) - Buffered inputs automatically trigger associated abilities when consumed.
- In the
-
Manual Binding:
- In
On Input Buffer Consumed, activate abilities manually:OnInputBufferConsumed (InputTag: InputTag.Dodge) -> ActivateAbilityByClass(Class: GA_Dodge)
- In
Creating Custom Input Actions
Extend the system by adding new input actions with custom behaviors.
-
Create a new
Gameplay Tagin the Gameplay Tag Manager (e.g.,InputTag.MyNewInput). -
In Project Settings > Input, create a new Input Action (e.g.,
IA_MyNewInput) and map it to a key in theIMC_CombatInput Mapping Context. -
In
BP_PlayerCharacter, bind the input action’sPressedandReleasedevents:Enhanced Input Action (IA_MyNewInput, Triggered) -> Get Component By Class (Class: BP_InputBufferComponent) -> Store Input In Buffer (InputTag: InputTag.MyNewInput, bConsumeInputBuffer: true, Input Status: Pressed)Enhanced Input Action (IA_MyNewInput, Completed) -> Get Component By Class (Class: BP_InputBufferComponent) -> Store Input In Buffer (InputTag: InputTag.MyNewInput, bConsumeInputBuffer: false, Input Status: Released)
Note:
bConsumeInputBuffer determines which StoreInputInBuffer call consumes the input and activates the input action. So set this value to true on the input where you wish for the input to actually happen and set it to false on the other input event.
-
Add
ANS_InputBufferto relevant Animation Montages (e.g.,MyAction_Montage) for buffering. -
If no montage exists, create Animation Montage for animation associated with the input.
-
In
On Input Buffer Consumed, add a new case forInputTag.MyNewInput:On Input Buffer Consumed -> Switch on Gameplay Tag -> Case InputTag.MyNewInput -> PerformMyNewAction -
Test the new input in-game to ensure it buffers and triggers correctly.
Example: Dodge Action
-
Setup
InputTag.Dodge,IA_Dodge, and add the new input action to desiredInput Mapping Context. -
Create Dodge Input events in Pawn or Character and on Pressed and Released events call
StoreInputInBufferfrom the Pawn or CharactersInputBufferComponent.- Call
StoreInputInBuffer(InputTag.Dodge, true, Press)
- Call
OnMyInputPressed:
  -> StoreInputInBuffer(InputTag.MyNewAction, true, Press)
OnMyInputReleased:
-> StoreInputInBuffer(InputTag.MyNewAction, false, Release)-
Create Dodge Action or Ability
- The dodge ability or action is the part that ultimately plays the dodge animation.
-
In the
On Input Buffer Consumed, trigger the dodge logic.
OnInputBufferConsumed:
// If Using with Abilities System
  -> if(IsAlive()) -> GetAbilitySystemComponent -> TryActivateAbilitiesByTag(->BufferedInputTag) // will use the dodge tag to automatically activate the ability by tag

  // If Using Standalone without Ability System
  -> if(IsAlive() && BufferedInputTag == InputTag.Dodge) -> PerformDodge() // Function for actually performing dodge action and playing dodge animation
NOTE:
If integrating with Abilities System be sure to create the corresponding ability and grant the ability using an ability set associated with the input tag. Check Ability System Documentation for more information.
-
Create Dodge Animation
- Create as Animation Montage.
- Associate animation with Dodge Action or Ability.
-
Add Input Buffer notify state in dodge animation
- Adjust to desired position and duration.
-
If Using Abilities System:
- Grant Dodge Ability Using a Combat Style or Ability Set, setting the associated tag to
InputTag.Dodge. - Correctly grant abilities and associate the ability with the input tag
- To grant input-bound abilities, use
GiveAbilitySetson the actor’sAbilitySystemComponent, or associate the ability with the appropriate weaponCombatStyle.
- To grant input-bound abilities, use
- Grant Dodge Ability Using a Combat Style or Ability Set, setting the associated tag to
Troubleshooting
- Inputs Not Triggering:
- Confirm
On Input Buffer Consumedis bound and handles the correctInputTag. - Ensure
ANS_InputBufferis on the Animation Montage and the montage plays correctly. - Verify
bConsumeInputBufferistruefor the intended trigger event (PressedorReleased).
- Confirm
- Buffer Not Opening:
- Check that
ANS_InputBufferis correctly placed in the Animation Montage and the Animation Blueprint references it. - Ensure
BP_InputBufferComponentis not disabled on the pawn.
- Check that
- Unexpected Input Behavior:
- Verify unique
InputTagvalues to avoid conflicts. - Check that
bConsumeInputBufferisfalsefor non-trigger events to prevent premature consumption.
- Verify unique
- Abilities Not Activating:
- For
Advanced Abilities System, ensure abilities are granted viaAbility SetorCombat Stylewith matchingInputTagvalues. - Confirm the pawn has the
Gameplay Ability Systemcomponent and abilities are not blocked.
- For
Best Practices
- Workflows:
- Use hierarchical
InputTagnaming (e.g.,InputTag.Combat.Dodge) for organization. - Test new inputs with existing Animation Montages before creating custom ones.
- Centralize input handling in
On Input Buffer Consumedfor maintainability.
- Use hierarchical
- Pitfalls to Avoid:
- Don’t add
ANS_InputBufferto every Animation Montage; reserve it for committed actions. - Avoid binding
On Input Buffer Consumedmultiple times, as it may cause duplicate executions. - Don’t set
bConsumeInputBuffertotruefor bothPressedandReleasedunless intentional.
- Don’t add
- Performance Considerations:
- Use specific
InputTagfilters inStore Input In Bufferto avoid queuing irrelevant inputs. - Optimize
On Input Buffer Consumedlogic to avoid complex branching for large input sets.
- Use specific