Follow these steps to integrate the Advanced Targeting System into a new Unreal Engine 5 project. These steps are necessary for custom setups, as the system is pre-configured in the default project included with Advanced ARPG Combat.
-
Prerequisites:
- Unreal Engine 5.3 or later.
- A pawn (e.g., player character) to host the targeting component.
- The default targetable actor (e.g., an enemy with
BP_TargetingInterface) or custom targetable actors in the project.
-
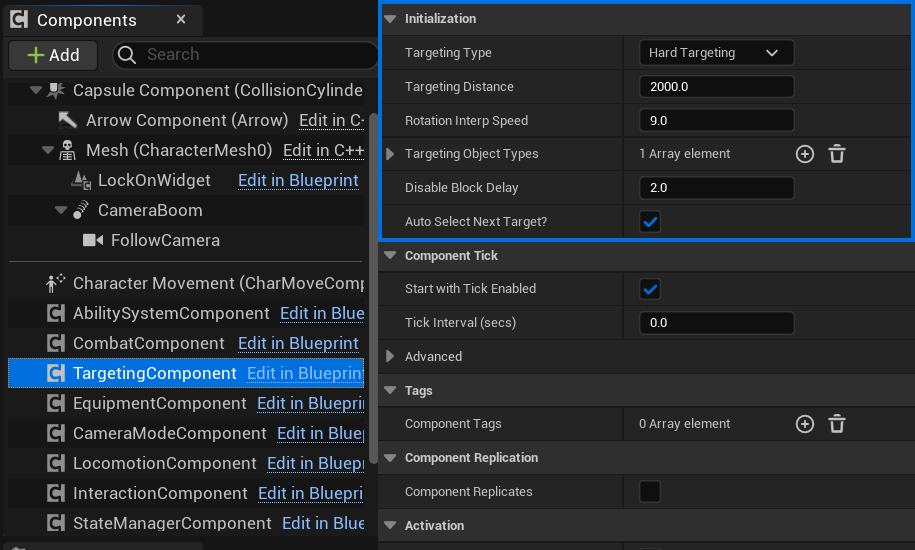
Add the Targeting Component:
- Open the Blueprint of the pawn that will perform targeting (e.g., player character).
- In the Components panel, click Add Component and select
BP_TargetingComponent. - Select the
BP_TargetingComponentin the Details panel and configure properties as needed:Targeting Distance: Set the maximum distance for valid targets.Rotation Interp Speed: Control how quickly the pawn rotates to face the target.Targeting Object Types: EnsurePawnis included (default).bAutoSelectNextTarget: Enable to auto-select a new target if the current one becomes invalid.
-
Set Up Input Bindings Using Enhanced Input:
- Create the following Input Action assets in the Content Browser (e.g., under
Content/Input/Actions):IA_ToggleLockOn(e.g., mapped to “T” key).IA_SwitchTargetRight(e.g., mapped to “E” key).IA_SwitchTargetLeft(e.g., mapped to “Q” key).
- In each Input Action asset, add the corresponding key mapping under Mappings.
- In Project Settings > Engine > Input, under Bindings, assign the Input Actions.
- Ensure the project uses the Enhanced Input System:
- In Project Settings > Game > Default Classes, set the Default Pawn Class to use a Blueprint with an Enhanced Input Component (or add it to your pawn).
- In Project Settings > Input > Default Input Component Class, select
EnhancedInputComponent.
- In the pawn’s Blueprint:
- Create an Input Mapping Context asset (e.g.,
IMC_TargetinginContent/Input). - Map
IA_ToggleLockOn,IA_SwitchTargetRight, andIA_SwitchTargetLeftto theIMC_Targetingcontext in the Input Mapping Context asset. - On Event BeginPlay, call
Add Mapping Context(from the Player Controller) to applyIMC_Targeting. - Bind the Input Actions to functions:
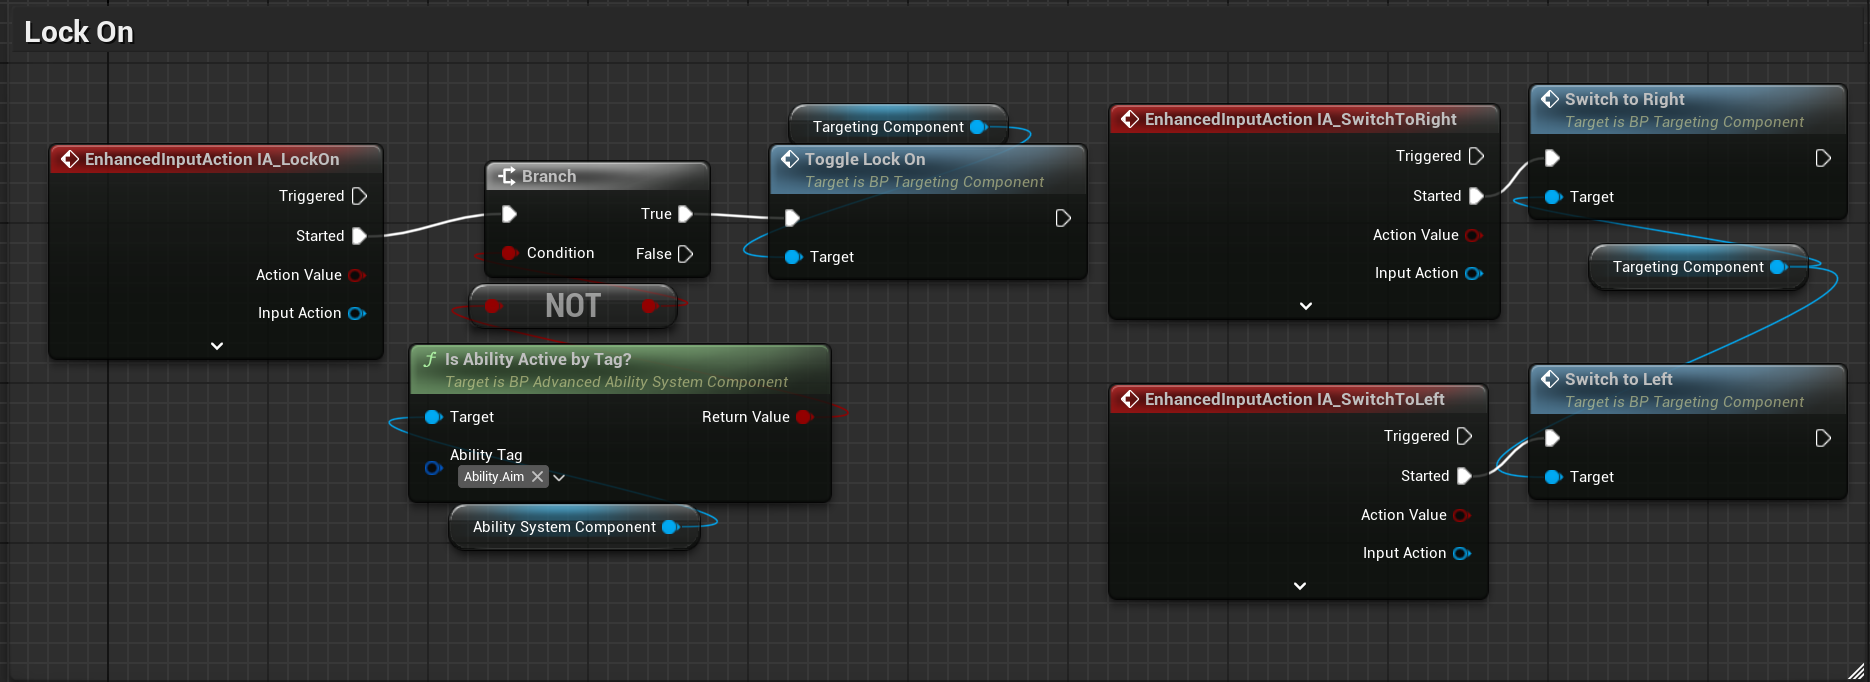
- Add Input Action nodes for
IA_ToggleLockOn,IA_SwitchTargetRight, andIA_SwitchTargetLeft(using the Enhanced Input Component). - Connect the Triggered pins to call
ToggleLockOn,Switch To Right, andSwitch To LeftonBP_TargetingComponent, respectively.
- Add Input Action nodes for
- Create an Input Mapping Context asset (e.g.,
- Create the following Input Action assets in the Content Browser (e.g., under
-
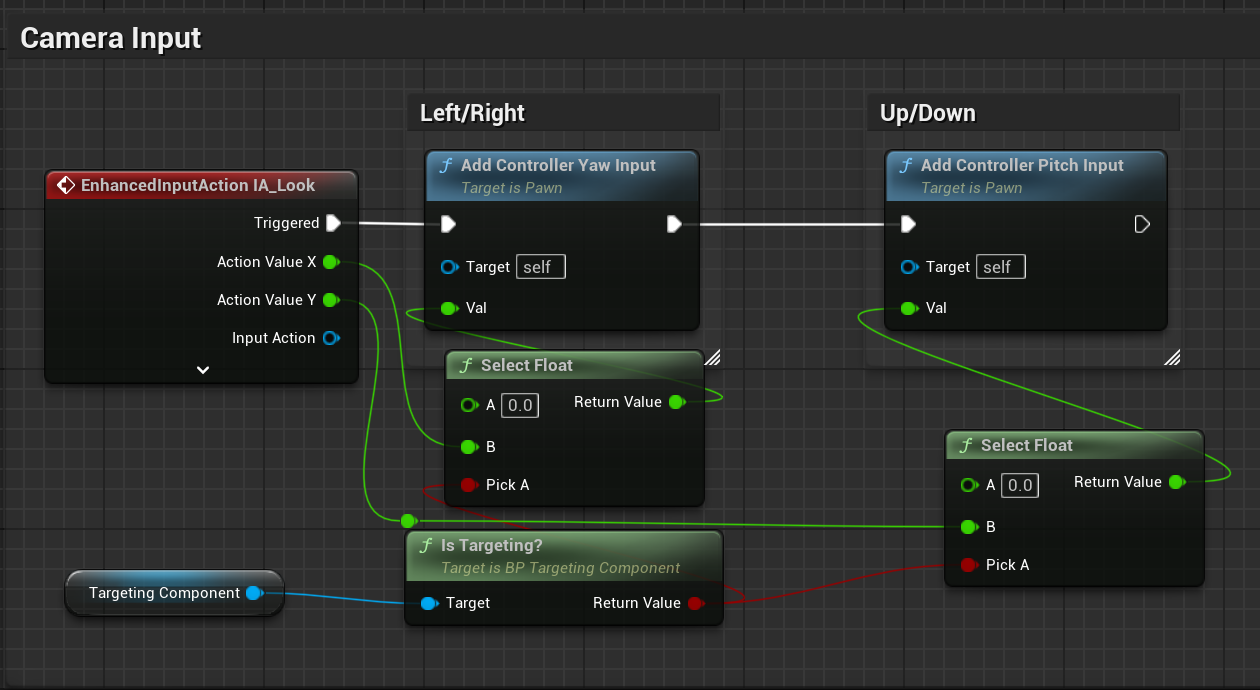
Modify Look Input:
- In the pawn’s input handling (e.g., in the Blueprint graph), add a condition to disable look input (e.g., yaw/pitch) when
BP_TargetingComponent’sIsTargetingproperty is true. Use an Input Action node for look input (e.g.,IA_Look) and gate it with a branch checkingIsTargeting.
- In the pawn’s input handling (e.g., in the Blueprint graph), add a condition to disable look input (e.g., yaw/pitch) when
-
Test with Default Targetable Actors:
- Place a default targetable actor (e.g., an enemy Blueprint pre-configured with
BP_TargetingInterfaceand a Widget Component forWBP_LockOn) in the level. - Ensure the actor’s collision settings respond to the
Pawnobject type (or other types specified inTargeting Object Types). - Playtest to ensure the system locks onto the actor, displays the
WBP_LockOnwidget, and allows target switching.
- Place a default targetable actor (e.g., an enemy Blueprint pre-configured with
Troubleshooting:
- If the lock-on widget doesn’t appear, verify that the targetable actor has a Widget Component with the Widget Class set to
WBP_LockOnand thatOn Target Selectedsets its visibility. - If targeting fails, check that
Targeting Object TypesinBP_TargetingComponentincludes the relevant object types (e.g.,Pawn) and that targetable actors implementBP_TargetingInterface. - If inputs don’t work, ensure the
IA_ToggleLockOn,IA_SwitchTargetRight, andIA_SwitchTargetLeftInput Actions are bound in the Input Mapping Context and that the Enhanced Input Component is set up correctly. - If rotation feels jittery, adjust the
Rotation Interp Speedproperty inBP_TargetingComponent. - For custom targetable actors, see the “Creating a Custom Targetable Actor” subsection in the Usage Guide.